
Come Wednesday, I'll have been cooking sous vide for 2 years. Sous vide is a cooking technique that many people have not even heard of, much less understand.
The science behind sous vide cooking can be difficult to understand. There are food safety aspects that must be understood and adhered to. Sous vide has been around for many years, but its popularity has been skyrocketing in recent years.
So what is sous vide? The name itself is French for "under vacuum". Most foods cooked with method are vacuum sealed in a plastic pouch and cooked in a precisely controlled water bath. The water bath is most often set to a temperature just above the desired final temperature of the food. Most foods cooked with this method are proteins (aka meat).
One of the reasons this works well is that water transfers heat to the food incredibly well compared to air. We all know this without realizing it - we think nothing of sticking our hands into a 450F oven, but would never intentionally contact water at even 150F. Because the pouch has no air inside, the heat transfers efficiently into the food.
While some feel that the food in the pouch must be under vacuum, I have found this to be unnecessary. I use zip-loc freezer bags and remove the air by immersing in water up to the "zipper", which effectively squeezes out all of the air. I've found this to be as effective and much less troublesome than foodsaver type vacuum sealers.
Equipment for cooking sous vide is becoming more commonplace and inexpensive all the time. Mainstream manufacturers are beginning to offer appliances. No longer is it necessary to buy re-purposed lab equipment or cobble together your own apparatus (like I did).
In part 2, I'll run through some representative preparations
Saturday, March 24, 2012
Saturday, March 17, 2012
BBQ Pulled Pork
I've been smoking pork shoulder (AKA Boston butt) for a few years. Now I just might be biased, but I like mine better than any other I've had...so far. People say you can make pulled pork in the oven or the slow cooker or even on the stove top, but to my mind, the smoker is where the really good stuff comes from.
Unlike many things I cook, I stay pretty close to the same formula every time I do pulled pork. There's a lot to be said for consistent results every single time.
I don't think it really matters what kind of smoker you use, as long as you know how to maintain a steady cooking temperature with it. What you burn in it does make a difference though. I use charcoal for heat and oak for the smoke. The type(s) of wood you use will make subtle differences in taste, so feel free to experiment. The charcoal you use also has an effect, but less so.
I use the pork you find in any supermarket or shopping club. If you have a source for better pork such as free range and / or heritage breed, and can afford it, your results should be even better. Most butts you see will be between 6 and 10 lb., with the average around 7 1/2 lb. I watch for sales at my favorite stores and buy several, freezing what I won't use right away. Just make sure the meat is completely thawed before you begin.
The 1st step is to apply the rub 12-24 hours before you smoke. Here is a basic rub that works well for me:
Score the fat side of the butt in a one inch diamond pattern, just deep enough to get through the fat and into the meat. Slather the entire butt with a generous amount of yellow mustard. No need to use fancy mustard - you don't even taste it in the final product. Mustard helps the rub to work a bit of magic on your meat. Apply the rub to all exposed surfaces of the butt. There is no such thing as using too much rub, so don't be stingy. Work it into the meat with your fingers, making sure you get it into the scores on the fat side. Wrap the butt in plastic wrap and put it in the fridge.

Depending on size and cook temp, your pork will take 10-14 hours to finish, so plan accordingly. I often make mine ahead of time and freeze or refrigerate, especially if chow time is earlier in the day. Pulled pork keeps really well in the freezer.
While you're getting the smoker going, unwrap the butt and let it rest on a rack for 1/2 hour before going into the smoker. This allows the rub to dry into a tacky coating that attracts & traps that good smokey flavor.
I put a pan of hot water in the smoker to keep the moisture content up. Depending on your smoker, you may not need this.
Once the smoker is going and the pork has rested, into the smoker it goes, fat side down. I try to maintain a temp of 250F, give or take 25 degrees. After 2-3 hours, rotate the butt for even cooking, especially if you have an offset smoker. In any case, the fat side should now be on top. After another 2-3 hours, wrap the butt in foil. Since it's wrapped in foil, it matters not whether you finish in the smoker or in your oven. I use the oven, because my meat probe thermometer doesn't like the smoker.
Continue cooking until the internal temperature is 195F. Transfer the butt to a cooler, cover with towels, and let it rest for at least 1 hour, preferably 2.
After resting, unwrap and shred / pull apart. I use a large fork to pull apart. You'll have quite a bit of liquid in the foil with the meat. This goes right in with the pulled meat. After pulling, give everything a good stir and either serve or wrap up and store. I use regular hamburger buns to serve on, and encourage people to try with no sauce first. I have never put sauce on my own sandwiches.
If you do have to reheat, do it gently. A slow cooker on low works well, as does a foil covered pan in a 200-225F oven.
Enjoy!
Unlike many things I cook, I stay pretty close to the same formula every time I do pulled pork. There's a lot to be said for consistent results every single time.
I don't think it really matters what kind of smoker you use, as long as you know how to maintain a steady cooking temperature with it. What you burn in it does make a difference though. I use charcoal for heat and oak for the smoke. The type(s) of wood you use will make subtle differences in taste, so feel free to experiment. The charcoal you use also has an effect, but less so.
I use the pork you find in any supermarket or shopping club. If you have a source for better pork such as free range and / or heritage breed, and can afford it, your results should be even better. Most butts you see will be between 6 and 10 lb., with the average around 7 1/2 lb. I watch for sales at my favorite stores and buy several, freezing what I won't use right away. Just make sure the meat is completely thawed before you begin.
The 1st step is to apply the rub 12-24 hours before you smoke. Here is a basic rub that works well for me:
- 1/2 C kosher salt
- 1/2 C sugar (any will do, experiment!)
- 1/4 C Paprika
- 3 TB chili powder
- 1 TB garlic powder
- 1 TS dried basil
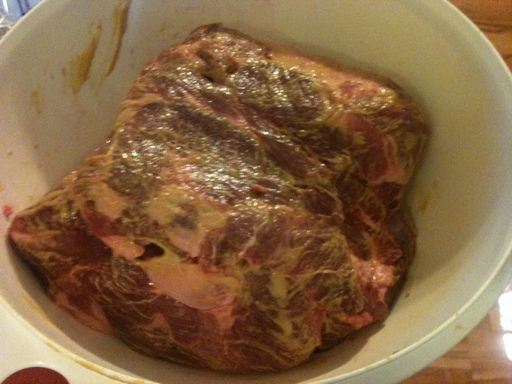
Score the fat side of the butt in a one inch diamond pattern, just deep enough to get through the fat and into the meat. Slather the entire butt with a generous amount of yellow mustard. No need to use fancy mustard - you don't even taste it in the final product. Mustard helps the rub to work a bit of magic on your meat. Apply the rub to all exposed surfaces of the butt. There is no such thing as using too much rub, so don't be stingy. Work it into the meat with your fingers, making sure you get it into the scores on the fat side. Wrap the butt in plastic wrap and put it in the fridge.
 | |
| Scored fat cap. |

 | |
| Coated with mustard. |
 | |
| My primitive rub shaker. |
 | |
| Rubbed. |
 | |
| Wrapped in plastic. |
Depending on size and cook temp, your pork will take 10-14 hours to finish, so plan accordingly. I often make mine ahead of time and freeze or refrigerate, especially if chow time is earlier in the day. Pulled pork keeps really well in the freezer.
While you're getting the smoker going, unwrap the butt and let it rest on a rack for 1/2 hour before going into the smoker. This allows the rub to dry into a tacky coating that attracts & traps that good smokey flavor.
I put a pan of hot water in the smoker to keep the moisture content up. Depending on your smoker, you may not need this.
Once the smoker is going and the pork has rested, into the smoker it goes, fat side down. I try to maintain a temp of 250F, give or take 25 degrees. After 2-3 hours, rotate the butt for even cooking, especially if you have an offset smoker. In any case, the fat side should now be on top. After another 2-3 hours, wrap the butt in foil. Since it's wrapped in foil, it matters not whether you finish in the smoker or in your oven. I use the oven, because my meat probe thermometer doesn't like the smoker.
 | |
| Ready to foil wrap with temp probe. |
 | |
| Foil wrapped. |
Continue cooking until the internal temperature is 195F. Transfer the butt to a cooler, cover with towels, and let it rest for at least 1 hour, preferably 2.
 | ||
| Resting in the cooler (shown with lid open). |
After resting, unwrap and shred / pull apart. I use a large fork to pull apart. You'll have quite a bit of liquid in the foil with the meat. This goes right in with the pulled meat. After pulling, give everything a good stir and either serve or wrap up and store. I use regular hamburger buns to serve on, and encourage people to try with no sauce first. I have never put sauce on my own sandwiches.
If you do have to reheat, do it gently. A slow cooker on low works well, as does a foil covered pan in a 200-225F oven.
Enjoy!
Subscribe to:
Posts (Atom)

